- Why Us?
- Features
White Label
For SaaS Platforms & Agencies
Provide our complete analytics suite to your clients, directly within your own interface and with your/their own branding. Discover Analytics-as-a-Service and White Label Analytics. Great benefit, minimal effort.
- Pricing
- White Label
- Success Stories
- ResourcesGetting Started
-
Frequently Asked Questions
-
All About Features
- How to Install the Tracking Code
-
User Guides
-
Integrating With Other Platforms
-
Legal, Data Privacy & Certificates
- White Label Analytics
- Glossary
- Affiliate Program
- Contact
Visitor Segments
All You Need To Know About Visitor Segments!
Visitor Segments is a powerful feature that allows users to tailor their analytics and gain insights into specific groups of website visitors. This enables you to categorize visitors based on various attributes, making it easier to analyze their behavior and preferences.
In this support center article, we will walk you through the concept of Visitor Segments, how to create them, and how to apply them to your data for a more customized analytics experience.
We have 5 sections in this module that will help you understand and effectively use the Visitor Segments feature:
- Understanding Visitor Segments
- A Guide to Using Filters
- Create a New Segment
- Edit Segment
- Applying the Visitor Segments to the Pages Dashboard
Important Note: Access to this feature requires the purchase of a minimum pricing plan. If you do not have the required plan, you will be prompted to upgrade when attempting to create a new segment.
Some General Hints
- The Visitor Segments feature is NOT accessible on mobile devices.
- Visitor segments created by the owner will be visible to editors and watchers of the website.
- Editors can also create and edit visitor segments.
- If you are not subscribed to the required minimum pricing plan, a premium modal will appear once you click on the “Create Segment” button. The modal will display the required plan, your current plan, and the Upgrade Plan button.
Visitor Segments allow the users to define “visitor groups” based on certain attributes. These are subsets of your website's audience that share common attributes or behaviors. By defining these segments, you can analyze and compare how different groups of visitors interact with your website.
These saved visitor segments can then be applied to filter certain data in other views such as the Pages Dashboard providing you with targeted insights into your website traffic.
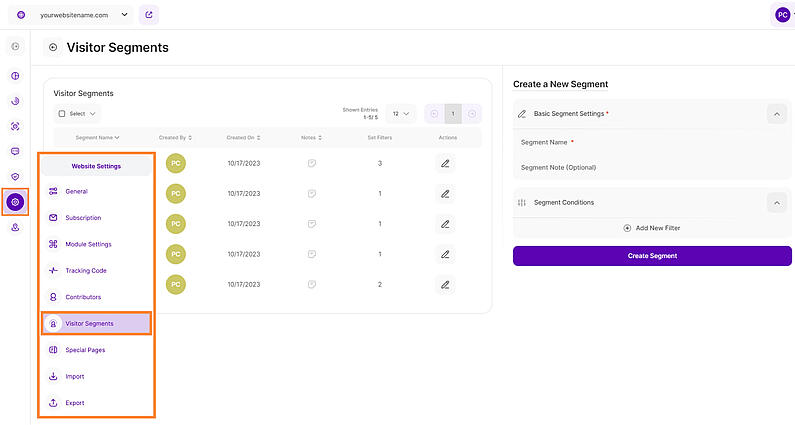
The Visitor Segments page is divided into two main parts:
- Existing Visitor Segments Table: This part displays a list of visitor segments that have already been created.
- Create a New Segment: This area allows you to create new visitor segments.
To effectively organize your website visitors into groups, it's crucial to understand which filters you can use either on their own or in combination to examine these distinct "visitor groups". These filters serve as your toolkit for personalizing your analysis, allowing you to uncover valuable insights into various aspects of how your audience acts and what they like. Let's take a simplified look at each filter and its practical applications:
- Browser Name: Allows you to filter the data by browser name which helps you optimize your website based on your audience preferences.
- Browser Version: Same with the Browser Name, you can ensure that your website is optimized for the browsers your audience prefers. Identify issues related to specific browser versions and prioritize fixes accordingly.
- City of Visit: Drill down into user location data even further by using this filter. This information can be pivotal for local businesses, helping them tailor their content and marketing strategies to specific cities.
- Company Category Associated With Visit: B2B businesses can derive significant value from this filter. Identify which companies are visiting your site and segment them by industry category. This can inform lead generation strategies and personalized outreach efforts.
- Company Name Associated Country Name: Same with the Company Category, this filter would help in analyzing the data by industry category, getting to know which companies from specific industries visit your website the most. This filter allows you to segment and organize your visitor data to gain insights into the types of companies and industries showing interest in your website.
- Country Name: Businesses with a global presence will appreciate the Country Name filter. It enables you to explore user behavior and preferences on a country-specific level, aiding in localization efforts and targeting strategies.
- Device Type: Understand how your audience accesses your website by filtering data based on device type. This filter helps ensure that your site is responsive and user-friendly across various devices, from desktops to smartphones.
- IP: The IP filter can be a valuable tool for tracking visits from specific IP addresses, such as those from your organization or potential clients. Monitor user activity and tailor your website experience accordingly.
- Operating System: Ensure optimal performance across different operating systems by filtering data by OS. This information can be used to identify compatibility issues and fine-tune your website for various platforms.
- Screen Resolution: This filter is essential for optimizing your website's layout and design. Make sure your site looks stunning on all screen sizes and resolutions by analyzing data through this filter.
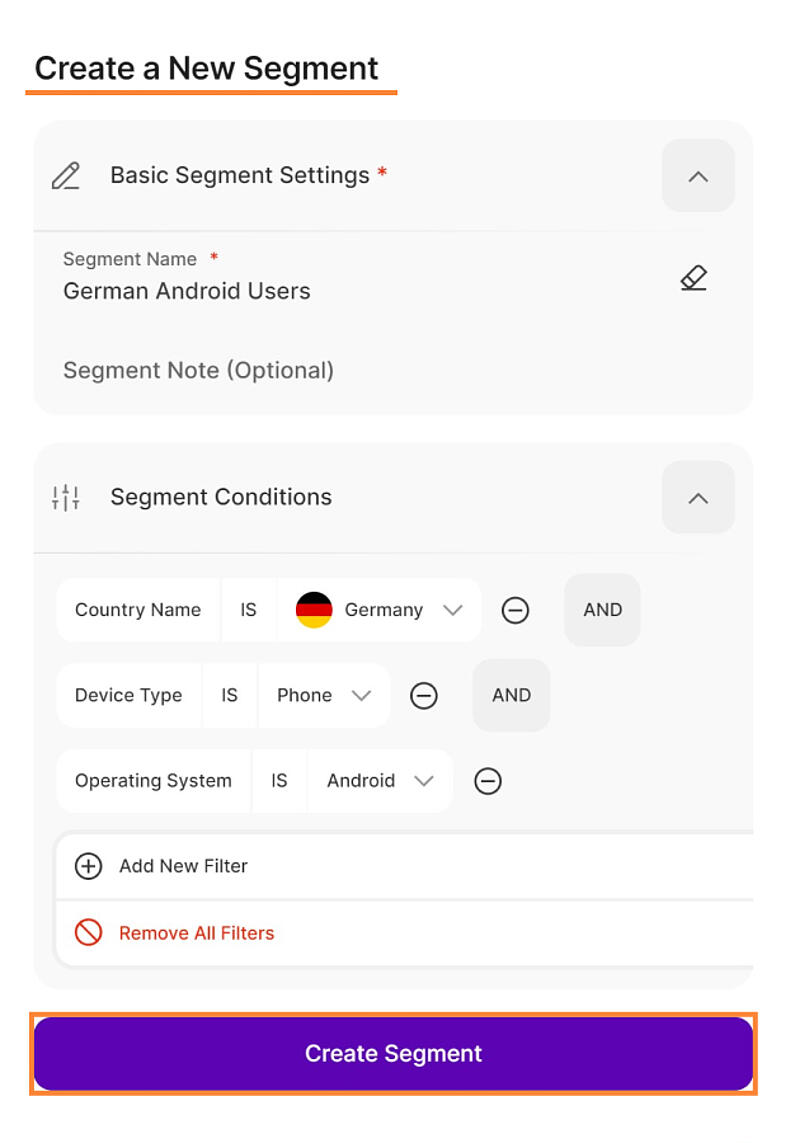
The right section provides the user with the capability to create a new visitor segment based on the conditions you want to set in segmenting your visitor groups. It is divided into two main sections:
1. Basic Segment Settings:
- Segment Name: In this field, you need to define a name for the visitor segment you are creating. This name can be up to a maximum of 50 characters. It's essential to choose a descriptive name related to the filter queries so that you can easily recognize and understand the purpose of this segment. This is a required field.
- Segment Note: Adding a note to the segment is optional. This is a field where you can provide additional information or context about the segment you're creating. It can be helpful for documenting the purpose or criteria of the segment.
2. Segment Conditions: In this section, you can set specific filter queries to define the conditions for segmenting your visitor groups. These conditions are essentially the criteria that determine which visitors are included in this segment. The conditions could be based on various factors like user behavior, demographics, or any other relevant data.
After you've filled in the mandatory fields, you can proceed to create the segment by clicking the "Create Segment" button. Once you do this, the newly created visitor segment will be added to a table on the left side of the interface. This segment will then be available for use within the visitor segment icon in the selected report blocks, allowing you to analyze data based on the criteria you've defined for this segment. This is a valuable tool for customizing your analysis and understanding specific subsets of your user base.
Important Note: Once you have created the visitor segment, a pop-up message will confirm the action with the statement, "Your changes were saved successfully!"
You have the flexibility to edit or delete any existing visitor segment as needed. This allows you to adjust the segment's criteria and name to align with your analysis requirements.
Here's a step-by-step guide on how to edit or delete an existing segment:
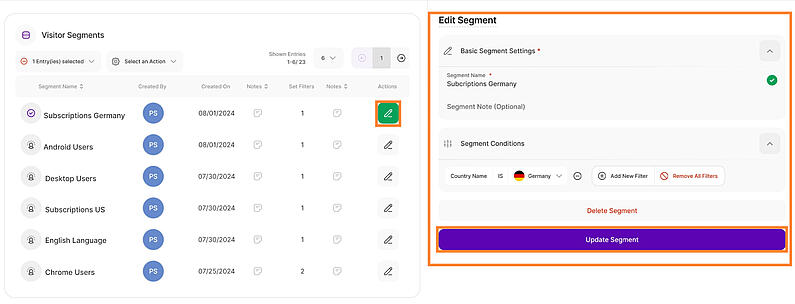
- On the Visitor Segments table, choose the specific segment that you want to edit by tapping the pencil icon under the Actions column to enter the editing mode for this segment.
- This will change the interface on the right from “Create a New Segment” to ”Edit Segment”. When in this mode, you have the option to adjust the segment name. You can easily do this by typing your desired changes in the provided text box. If you wish to remove the entire segment name, you can utilize the eraser icon to clear the current name, and then proceed to type the new name.
- To adjust the criteria that define the segment, work with the "Segment Conditions" section. Add a new filter by clicking the "Add New Filter" button. This allows you to refine the criteria by specifying additional conditions. Remove a filter by clicking the (-) icon next to the filter you wish to delete. If you prefer to delete all filters at once, use the "Remove All Filters" button.
- After making the necessary changes to the segment's name and conditions, click the "Update Segment" button. A pop-up message will confirm that your changes have been successfully saved.
- If you no longer require the segment and want to remove it from your list, you have the option to "Delete Segment." Please exercise caution when using this option because deleting a segment is an irreversible action. A confirmation pop-up will ask you to confirm your decision to delete the segment. If you're certain, click "Delete".
Important Note: For any changes made, there will be a popup message saying “Your changes were saved successfully!”.
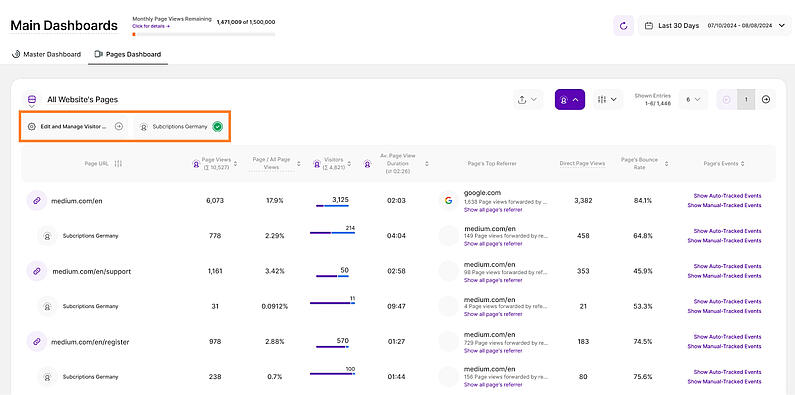
Now that we've covered the process of creating, editing, and deleting visitor segments, let's delve into how these segments can be effectively utilized in the Pages Dashboard. You'll notice a distinctive Visitor Segment icon positioned on the right side of the page. Clicking this icon transforms it to a purple color, signaling its activation. A list of existing visitor segments will appear below "All Website's Pages”.
Additionally, you'll find an option labeled "Edit and Manage Visitor Segments" next to the visitor segments list. When this option is selected, it will redirect you to the Visitor Segments screen.
To apply the visitor segments, follow these steps:
- Select the visitor segment you want to apply to the website pages listed below.
- Once selected, a green checkmark will appear on the right side. You can select one or more segments.
- Below each page URL, the visitor segments will be listed separately based on the order in which they were selected.
The table report block displays the following information:
- Segment Name: Shows the name of each segment.
- Page Views: Displays the total number of page views (formerly "Visits") each page URL has received during the selected period. It helps you understand the popularity of individual pages. The column header shows the sum of all page views.
- Page / All Page Views: This shows you the number of page views the page has received in the selected period of time and sets it into relation to the overall website’s traffic in the selected time period ( in % ).
- Visitors: Shows the total number of visitors differentiated between “Returning” = violet and “New” = blue visitors (ratio should be shown on hover). The column header shows the sum of all visitors for all pages.
- Average Page View Duration: Shows the average session duration for each page URL based on the selected time range. The column header shows the average page session duration of all pages.
- Page's Top Referrer: This displays the top referrer of each page URL. The data is not dependent on the visitor segments and will not change regardless of the segment selected.
- Direct Page Views: This column displays the amount of page views that were generated when visitors entered the page’s URL by typing it directly into the browser bar.
- Page's Bounce Rate: This shows the bounce rate (in %) associated with each page URL.
- Page's Events: Displays options to "Show Auto-Tracked Events" or "Show Manual-Tracked Events" which redirects to the Event Tracking report block.
By effectively utilizing these visitor segments in the Pages Dashboard, you can gain valuable insights into your website's performance and audience behavior, helping you make informed decisions to optimize your online presence.


